Wednesday, November 30, 2011

Me and Christmas


1. Wrapping paper or gift bags?
 I really love wrapped presents. 
But I enjoy the time you save on bags, so I do both!

2. Real tree or Artificial?
 I really wish I said real tree because they are so lovely, and smell good. 
But the truth is my trusty artificial  one is going on 17 years, I believe? 
It makes me sad to see a tree chopped down. 
We live on a prairie and have spent just under the last two decades planting 
hundreds of trees and shrubs on our property, turning it into a little wild life haven, 
so I really value the living life of a tree.


3. When do you put up the tree?
Usually, we wait until a weekend night just about 2-3 weeks before Christmas. 
We like to make a family event out of this, with music and holiday treats.
The kids want to hear the stories behind every ornament!

4. When do you take the tree down?
 I like to take the tree down just before New Years Eve. 
My kitties have been sleeping in the branches and tearing down the ornaments long enough! 
Ha ha, they think the tree is for them, sillies!

5. Do you like eggnog?
 I love Eggnog! My whole family will slurp it down before I get a taste!
We are holiday eggnog junkies. 
I love to use it in my coffee.


6. Favorite gift received as a child?
 I remember the year I got "Baby Bunny"!
She was a pretty little baby doll that was mechanical. 
She moved her arms up and down, 
and could be place on a riding bunny. 
With her arms extended and her kicking away, 
it was fun to play that she was galloping along on a bunny!
Hey, I wonder whatever happened to her! 
Does anyone else remember this toy?

7. Hardest person to buy for?
Teen age girls, and most men, like brother-laws. 
I just can't seem to get it right all the time. 
They boggle my creativity!

8. Easiest person to buy for?
 My mom, she is always happy no matter what, 
and I do love to make her happy. 
I will include my teenage daughter second here,
because she is good about letting me know her interests.

9. Do You have a nativity scene?
 I have a store bought one, 
that I add little animals from the local feed store toy area. 
I also have one I made from hand built clay 
that I made in my early college days!


10.Mail or email Christmas cards?
 I mail real cards to my recipients through the post office. 
I always enclose pictures of my kids.
I think this is one time of year to really enjoy checking our mail boxes.
You really don't get the same feeling with e-mail cards.

11. Worst Christmas gift you ever received?
 Dare I say it is a tie? 
One year I received a bottle of wrinkle cream (I was in my 20's) 
and the next year I received an empty wrapped pink box. 
It boggled my mind a little? Was this a sly insult?
(same person)

12. Favorite Christmas Movie?
 Rudolph the Red-Nosed Reindeer...every years since I was a kid 
this has been on TV, and then I finally feel like, 
"Okay, now it is Christmas"!

13. When do you start shopping for Christmas?
 Hit after Christmas sales if anything is what I can store for a year.
But mostly, sporadically in November, The frantically in December!

14. Have you ever recycled a Christmas present?
 Only once, and I got caught!
It was a tin of hard Christmas candies, 
I let my daughter re-gift it to her 1st grade teacher.
When I went to pick her up from school she thanked us for it 
and my daughter told her,
"Yes, my mom was glad she never ate it last year
when she got it!"
I was really embarrassed.

15. Favorite thing to eat at Christmas?
 Homemade Tamales!
Started with Grandma Josie!
Yummy family tradition.

16. Lights on the tree?
 Yes, lights! Of course.. and lots and lots of them.
But I don't like it to look like a wiry mess, 
so, I go up and down and around each branch. 
Takes a while but is worth it!

17.Travel at Christmas or stay home? 
 We don't travel far. 
The family almost all live within a 75 mile radius, 
so we take turns at mom and dads 
or my another family member home!


18. Open the presents Christmas Eve or morning?
 Christmas morning my kids wake me and my husband up, 
or so they think.. and we open our gifts. 
spend Christmas Eve with my husbands family, and gift exchange, 
and Christmas Day with my family and gift exchange.


Now it is your turn to play and post this little questionnaire.  
Come back to let me know so I can read your answers.
Have fun getting to know each other. No wrong answers!
So go ahead and play along!
 
Merry Christmas!
Little Susie Home Maker

Sunday, November 27, 2011

Chocolate Chip Cookies in Jar

Christmas is a wonderful time to share all your handcrafted talents. I wonder how many of you give away hand made gifts this time of year? What percentage of gifts you make? I know that I always make something for someone with my own two hands. I also prefer these gifts. These are gifts with real heart put into them.

I have been known to be in my kitchen on Christmas Eve, still putting together all the layered cookie ingredients in a jar. (I have the recipe below.) Yes, I sometimes am that bad! It's usually not that I wait, it's that I plan too much for too many people. So being a little more organized and figuring out just how much time you can spend each day before gift giving day is essential! That is something I am going to focus on for the rest of this season.

So plan on relaxing and enjoying the time you spend with your close ones, and enjoy the time you put into the hand made gifts you make. I am off now, to finish some pretty tree ornaments!


Chocolate Chip Cookies in a Jar
1 cup packed brown sugar
1/2 cup white sugar
1 1/2 cups semisweet chocolate chips
2 cups all-purpose flour
1 teaspoon salt
1 teaspoon baking soda

Mix together salt and baking soda with the flour. Layer the ingredients into a 1 quart, wide mouth jar. 

Cut out a 9 inch-diameter circle from pretty fabric of your choice. Place over lid, and secure with pretty covered hair rubber band. Or you can tie on a raffia or ribbon.  

Attach a card with the following baking directions.
 
Chocolate Chip Cookies 
Add ingredients in bold to mix in jar
  • Preheat oven to 375 degrees F (190 degrees C). 
  • In a large bowl, cream 1 cup of unsalted butter or margarine until light and fluffy. Beat in 1 egg and 1 teaspoon of vanilla. Mix in cookie mix. 
  • Drop teaspoonfuls of dough, spaced well apart, onto a greased cookie sheet.
  • Bake for 8 to 10 minutes in preheated oven, or until lightly browned. 
  • Cool on wire racks.
  • Makes 4 dozen


Saturday, November 26, 2011

Farewell Fall Leaves

With Thanksgiving past, and what a wonderful time it was, I am now switching gears to prepare for Christmas. For me this means saying farewell to the gorgeous Autumn color pallet.
I will first take down all my Autumn leaf garlands and little pumpkins and gourds, etc. Out with the oranges, yellows, reds and browns. What a pretty pallet of colors.

This always makes me a little sad because I don't believe my Harvest theme gets enough time to be on display. Next year I must start right in September!

Just like my pretty trees, the leaves just start to glisten in gold and a cold snap hits and BOOM! They all drop to the ground! Don't blink or you will miss it.
So I decided to share a couple of pictures I took of my large Cottonwood tree that was in full golden beauty just a few week ago. I really believe that trees change to these fire colors in the Fall so we will look at them in awe. Not to mention, make us feel as if we are really the worlds greatest photographers.

It is really God that does all the work, but He gives us these beautiful views to photograph, paint, or just enjoy. We can feel good about it. Thank you Father for the beautiful Autum color pallet! I love it.

Hope you enjoy my trees pretty fall colored leaves!

Blessings,
Susie


Tuesday, November 22, 2011

Liebster Blog Award...My Picks!


Liebster Blog ...
I received such a wonderful surprise! While looking at a comment on my Date Bars I received a message from Shirley of Zetta's Aprons. She informed me that she has chosen me to be one of her picks for the Liebster Blog Award.  This award is to showcase up and coming blogs with less than 200 followers.

I am very happy to be recognized from a fellow blogger. I have only started my blog and want it to be a blessing. This award has made me feel blessed. It is a rewarding feeling to know that someone is enjoying my blog and wants to share that feeling with others. Thank you kindly, Shirley.  If you haven't visited her blog, I urge you to soon.

Below you will find my picks. Congratulations, I pray that your blogs are a blessing and that anyone reading this post will take a peek at my blog pick's for this award, as well. They have been fun and rewarding for me to read.

The rules are to copy and post the award pic to your blog; thank and link back to the person who gave you the award.  Then pick 5 more blogs and leave them a comment.

I enjoy my picks, they are really the best. Thanks for letting me get to know you and bless you all!
Little Susie Home Maker

Sunday, November 13, 2011

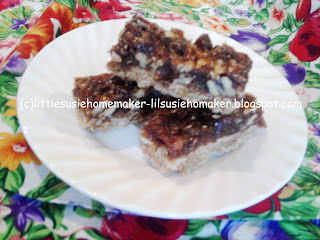
Date Bars


While going through our recipes, my mom and I stumbled upon a favorite old time recipe. We upgraded to our own  tastes, but not much different from a recipe that Quaker Oats printed on the box decades ago. Originally this was a dessert square, but we decided that it makes a great Little Susie Home Maker breakfast bar, or snack when individually wrapped in plastic wrap and served on the go. The long rectangle cut instead of squares, makes them perfect for dunking in milk, tea or coffee. So I wanted to share this recipe and let you enjoy it as a dessert, or breakfast or snack on the run. I have inserted a few options for you to adjust to your liking, which we all like to do to recipes, anyways. If you try these out, come back and comment on how you like to serve it. I would love to hear from you!

 Date Bars

1-3/4 cups old-fashioned oats
1-1/2 cups all-purpose flour
1 cup packed brown sugar
1 teaspoon baking soda
1/2 teaspoon salt
1 cup (2-sticks) cold butter, cubed
2-1/2 cups chopped dates
3/4 cup sugar
3/4 cup water
1 teaspoon vanilla (or rum) extract
1/2 cup chopped pecans (or walnuts)

In a large bowl, combine the oats, flour, brown sugar, baking soda and salt. Cut in butter until mixture resembles coarse crumbs. Press firmly into a 13x9 inch, baking pan.

In a large saucepan, combine the dates, sugar and water. (Use an electric hand chopper blender while still cool to puree the dates a little finer if possible. This puree can also be done prior to putting in pan, in a food processor, but this step is not necessary. This makes a smoother topping. Omit this step if a chewier date is preferred.) Cook for 10 minutes or until thickened, stirring frequently. Stir in nuts and extract. Spread over crust.

Bake at 350* for 30 minutes. Cool on a wire rack. Cut into rectangles 1x3 inches. Serve or store in air tight container.

Blessings,
Little Susie Home Maker

Saturday, November 5, 2011

Little Susie Home Maker's Favorite Pumpkin Pie

Can you think about Thanksgiving without thinking about Pumpkin Pie? I know I can't.  It is probably the most popular Thanksgiving dessert. Yes, the Pumpkin Pie is famous. So, I wonder just what is the perfect one? Is it the one Grandma used to make? Is it Mama's special touch? Maybe Uncle Joe's was the best, but don't forget the great cook books, or bakeries. Now many people love canned pumpkin, and there is the completely from scratch group. Who can turn down the throw in the oven frozen kind? I have also come to realize that the Thanksgiving Pumpkin Pie, can be a matter of great baking contests! You know the kind of competition, I am talking about. Who will get boasting rights this year? Some people believe that, if you you want it done right, you have to make it yourself. Others, believe that someone else can provide it, and that's the best way to go.

Here is my answer to this perfect pie. I truly believe that the best Pumpkin Pie, is the one shared with family and friends. The pie is a back drop to wonderful memories, and a delight to your palette and a comfort to your tummy. This is what forms my favorite pumpkin pie. It's the memories. We share these memories and make new ones every year with the Pumpkin Pie! Memories of the one that we laughed about which I made with my niece when she was only two, and she dumped a heap of cinnamon into the mix, it was great! The first one I cooked for my dear parents to enjoy, and hopefully to critique it well! Maybe, I can remember my nerves from my first time hosting Thanksgiving dinner, and the pie we shared together. Actually, every single pie that has ever been served with love from my mom, and the special crust from my dad; these are very warm memories with pumpkin pie. My mom remembers the one year that I carved out tiny maple leaves from the crust and carefully arranged them around the edge of the pie crust, with a large maple leaf shape baked in the middle of the pie. It sure was pretty! Thanks, Momma. I won't forget serving pumpkin pie to my Grandpa when I was younger, feeling I could take credit for his happiness, just for serving him a slice!

I can't choose a favorite Pumpkin Pie, but I can sure stir up some beautiful memories when I try! That's really it, the beautiful memories of the thanks we shared with our loved ones over the years, and those to come. That is what makes this pie so special. Thank You Heavenly Father for our wonderful Pumpkin Pie memories!

Just in case you do need a Pumpkin Pie Recipe, Here is one you can borrow from me with my pleasure. I pray that you can serve your Pumpkin Pie this year with lots of warm memories.

 Little Susie Home Maker's Favorite Pumpkin Pie

  • 1/2 cup granulated sugar
  • 1/4 cup brown sugar, packed
  • 11/2 teaspoon ground cinnamon
  • 1/2 teaspoon salt
  • 1/2 teaspoon ground ginger
  • 1/4 teaspoon ground cloves
  • 2 large eggs (Farm fresh if available)
  • 1 can (15 oz.) canned pumpkin (not pumpkin pie mix)
  • 1 can (12 fl. oz.) evaporated milk
  • 1 unbaked 9-inch (4-cup volume) deep-dish pie shell
  • Whipped cream (optional)

Directions

PREHEAT oven to 425° F
MIX  the first six dry ingredients in a medium bowl. In a large separate bowl, beat the eggs with a wire whip until smooth.  Add pumpkin and stir, carefully adding in the dry ingredients mixture. Gradually stir in evaporated milk using wisk or a hand mixer.

POUR into a prepared pie shell.
BAKE in oven for 15 minutes at 425° F then reduce temperature to 350° F; bake for another 45 minutes until done. Pie is done when knife inserted near center comes out clean. 
COOL completely for 2 hours on wire rack. 
SERVE with you favorite whipped cream and enjoy with your dearest ones!


Share the Memories!
Little Susie Home Maker

Valentine Swap 2017

 Don't you think Valentine swaps are fun? I sure do. Vivian had a nice big swap year That I signed up for and my partner was Cindy fro...